Are you worried about adding Google Analytics 4 to your WordPress site?
You’re not alone.
Switching to Google Analytics 4 or GA4 seems like a daunting task.
Will I lose data? What’s the difference? Should I use GA4?
These are some of the popular questions our users are asking us.
So today, in this ultimate guide, we’re going to detail everything you need to know about Google Analytics 4.
We’ve made it as simple as we can and removed all the fluff so you can learn about GA4, set it up on your site, and start tracking right away. Here’s what we’ll be covering:
- What is Google Analytics 4?
- Google Analytics 4 vs Universal Analytics
- Should I Switch to Google Analytics 4?
- How to Set Up Google Analytics 4?
- FAQs on Google Analytics 4
Let’s dive right in.
What is Google Analytics 4?
Google Analytics 4 (popularly known as GA4) is the latest version of Google’s analytics platform. It’s like an upgraded version of Universal Analytics that we’re all familiar with.
Here’s a look at the new Google Analytics Dashboard:

So GA4 comes with a ton of new features to track your website and get detailed insights into its performance. The highlights of GA4 include:
- Based on machine learning making the platform more intelligent
- Gives you insights into customer journey across platforms and devices
- Focuses on privacy
- More durable data for the future
- Seamless integration with Google’s advertising platforms
- Easier optimization of campaigns to drive marketing ROI higher
Setting up GA4 is easy but you’ll have to re-learn a new platform. Many of the reports that you might be used to don’t exist in the new Google Analytics 4 platform. However, they may be reintroduced later on.
Overall, you can expect GA4 to have a learning curve but it will give us new and advanced ways to measure and analyze traffic like never before.
Google Analytics 4 vs Universal Analytics
GA4 is similar to Universal Analytics (UA) but there are quite a few stark differences. For starters, the navigational menu and dropdown options have changed.
So if you’re currently using Universal Analytics and you make the switch to GA4, that’s one of the first things you’ll notice. You’ll have to spend a few minutes learning the new navigation.
Apart from that, here are the key differences between the 2 platforms. Keep in mind though that Google is constantly innovating and new features, reports, and functionality would be added as the platform continues to be developed.
- No historical data: Once you move to GA4, you’ll start afresh. This means your old data won’t be transferred from the UA property. The bright side, for now, is that you can switch between the two views to see your old data. This is also why you should set up GA4 for your site as soon as possible. So when Universal Analytics is retired, you’ll have some historical data present in GA4.
- Bounce rate report is missing: Bounce rate shows you how many people leave your site quickly after viewing just one page. This metric has been replaced with engaged sessions that actually give you deeper insights into people leaving your site. So instead of just seeing a percentage, you’ll see more data on the people who left your website. Added to that, Google wants its users to shift focus to engagement rate. This shows you data on who’s staying on your website rather than who’s leaving.
- GA4 uses events instead of goals: Google only tracks events and conversions now. There’s no option to create goals, however, you can choose which events you want to count as conversions. And there’s an easy way to do this just by toggling a switch. The good thing about this is that Google will track some events for you without having to modify the code of your site.
So you can see that GA4 does have some really cool upgrades. But right now, when you see reports on your dashboard, they look quite complex. In our opinion, the new platform isn’t beginner-friendly yet and there’s a pretty steep learning curve to it.
Given the drawbacks of the new platform, should you make the switch? We give you a detailed answer next.
Should I Switch to Google Analytics 4?
Yes – is the short answer.
If you’re already using Universal Analytics, you’ve likely seen this warning in your dashboard:
“Universal Analytics will no longer process new data in standard properties beginning July 1, 2023. Prepare now by setting up and switching over to a Google Analytics 4 property.”

This means your current Google Analytics will no longer fetch new data from July 1, 2023. You’ll be able to see your Universal Analytics reports for a period of time after July 1, 2023. But all new data will only flow into Google Analytics 4 properties.

Added to this, your historical data from Universal Analytics won’t be transferred to GA4. So it’s important that you make the switch soon.
That way, you can start collecting data right away in GA4. Then when we’re all forced to make the switch in July, you’ll have some historical data to rely on.
In a nutshell, you don’t have to start using Google Analytics 4 right away. But you should set it up as soon as possible and let it gather data.
Now we know that setting up GA4 seems intimidating but we’re here to guide you through the easiest way to get it done. The method we’ll be using today will let you add dual tracking to your site so that you can use GA4 as well as Universal Analytics.
How to Set Up Google Analytics 4?
You can set up Google Analytics 4 on your own but there’s a technical process to follow. This isn’t beginner-friendly and you need to have a basic understanding of coding your site. So anyone that isn’t tech savvy would end up avoiding this switch for as long as they can.
Luckily for WordPress users, there’s a much easier way – and that’s MonsterInsights.

MonsterInsights is hands down the best analytics plugin for WordPress. It lets you easily connect your site to Google Analytics. In fact, all it takes is a few clicks, there’s zero coding involved. This makes MonsterInsights the most beginner-friendly solution to set up GA4 on your WordPress site.
There’s more. MonsterInsights lets you track both Universal Analytics as well as Google Analytics 4 simultaneously.
This means you can set up GA4 now and let it run while you continue to use Universal Analytics. You’ll have plenty of time to navigate through GA4 and learn the new platform before the switch becomes permanent.
Also, MonsterInsights comes with advanced tracking features built into the plugin. You can add:
- Form tracking
- Event tracking
- eCommerce tracking
- Custom dimensions
- Social media tracking
- Outbound link tracking
That’s just to name a few. And we aren’t kidding when we say there’s no coding involved. You can enable these reports with the click of a button or by using addons.
That said, let’s get started with the easy step-by-step tutorial to set up Google Analytics 4 on your WordPress site.
Step 1: Set Up Your Google Analytics Account
If you’re new to Google Analytics, then you’ll need to sign up for an account. If you’ve already got Universal Analytics set up, then skip ahead to Step 2.
Open the Google Analytics website and use the Get started today button in the top right corner of the page.

If you have an existing Google account, you can sign into it or click the Create account link to create a new Google account.
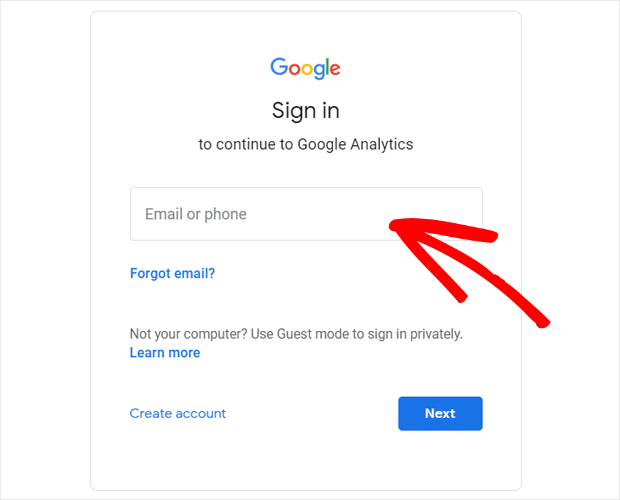
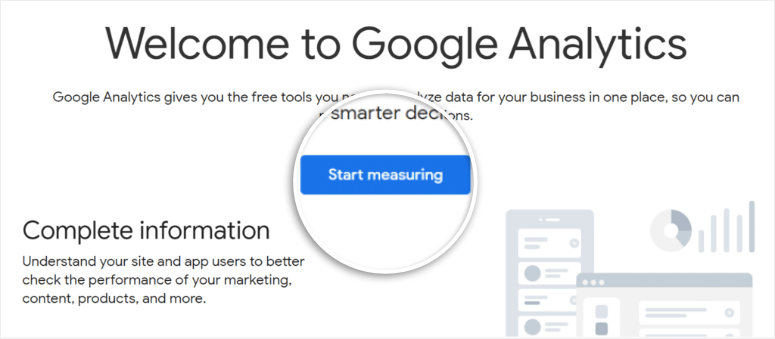
Once you’re signed in, click the Start measuring button on the next screen.
On the next page, enter an Account name for your Google Analytics account. Now different data sharing settings will appear. You can check all the boxes here and then click Next.

After that, you need to enter the property details of your website. This will include a name, a reporting time zone, and your currency.

Next, you can choose from two options:
- Set up a GA4 property (recommended option)
- Set up both GA4 and UA at the same time
Set up a GA4 property
To set up your GA4 property, you’ll need to fill in more business information. Once you’ve entered all the details, scroll down and click Create.

You’ll see a popup asking you to accept the Google Analytics Terms of Service. You can tick the checkbox and click “I Accept”.
Now you’ll need to create a data web stream. Since you’re setting this up for a WordPress website, click the Web button.
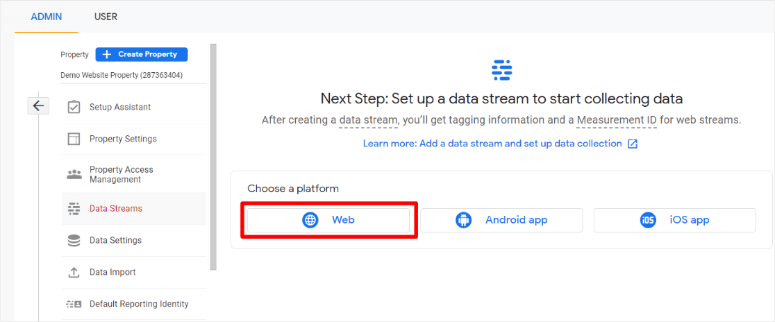
Then Google will ask you for your website’s URL and name.
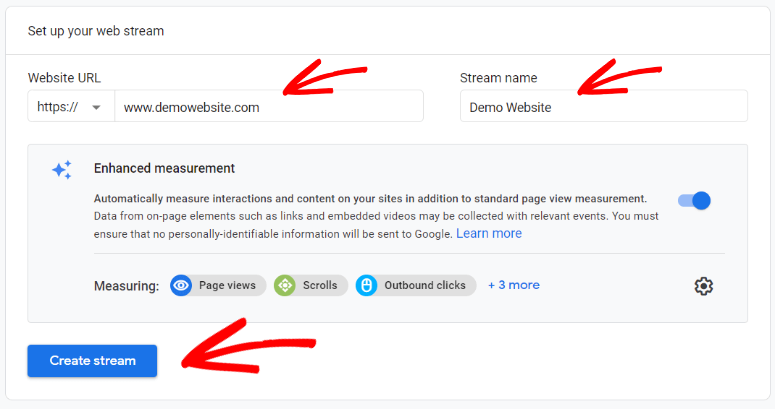
Click the Create stream button and that’s it.
Set up both GA4 and Universal properties
If you want to set up both properties simultaneously, after you enter your property name and choose your time zone and currency, click the Show advanced options link.

Simply switch on the toggle button here to create a Universal Analytics property. You’ll need to enter your website’s URL and select the checkbox to create both properties.
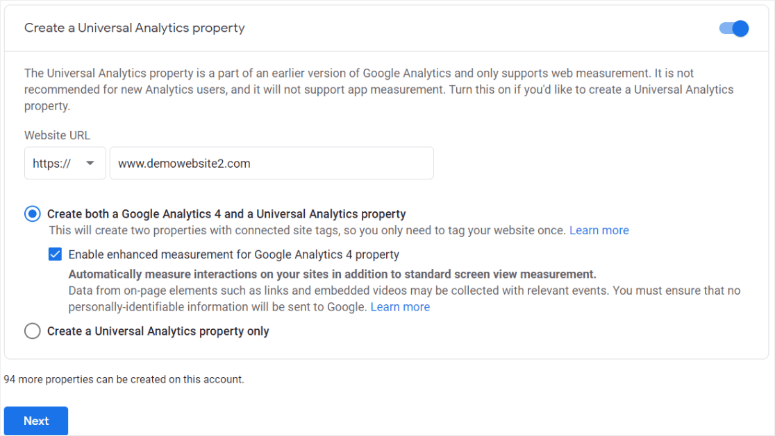
Once you click the Next button, Google will ask you to fill in your business details. Then, click the Create button. Google may display a popup asking you to accept the Google Analytics Terms of Service. All you have to do is tick the checkbox and click on I Accept.
After this, you need to connect Google Analytics to your site. This is where the coding part would usually come in but not today. We’ll be using MonsterInsights to quickly make the connection.
Step 2: Set Up MonsterInsights
To connect your site to GA4, you need to insert your Google Analytics tracking code into your WordPress website’s code. That’s technical stuff and if you don’t know what you’re doing, you could break your site.
With MonsterInsights, all you have to do is click a few buttons and the plugin will take care of all the backend coding for you.
To get started, you’ll need to sign up for a MonsterInsights account. Then inside your account, you can download the plugin file which you’ll need to install on your WordPress site.
In your WordPress admin panel, navigate to Plugins » Add New and click the Upload Plugin button at the top.

Now you can choose the MonsterInsights zip file you downloaded. Upload and activate the plugin on your site.
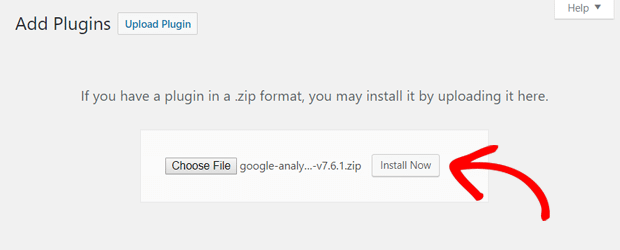
Never installed a plugin before? No worries, for detailed instructions, follow our guide: How to Install a WordPress Plugin – 3 Methods (Step by Step).
Now, the easy setup wizard will launch which will guide you through the steps needed to connect to Google Analytics.

On the welcome page, you’ll get options to choose the category of your website:
- Business website
- Publisher (Blog)
- eCommerce
Pick the one that best describes your site and continue to the next step.
Now before you can connect to GA4, you’ll need to connect MonsterInsights plugin to your website.
In your MonsterInsights account or in the email receipt of your purchase, you’ll find your MonsterInsights license key.
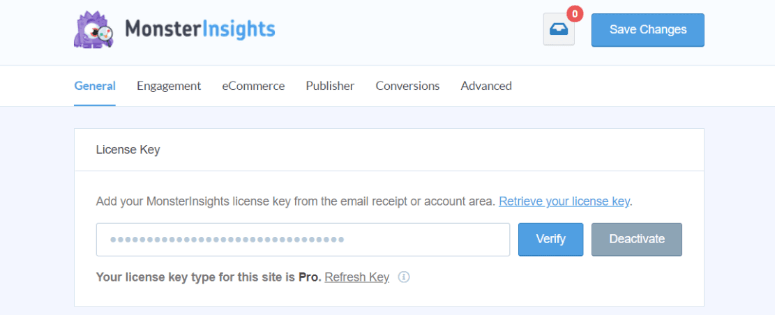
Copy this key and enter it in the setup wizard.

Click on the ‘Connect MonsterInsights’ button and it will verify your account and link it to your site. That’s it.

After that, you’ll see an option to connect your Google Analytics with your MonsterInsights account. Choose your account and then grant MonsterInsights the permissions it needs.

Next, you’ll need to pick a profile to complete the connection. In case you have multiple websites connected to your Google Analytics account, select the right website property here.
If you have both GA4 and Universal Analytics, then you can choose either one here.
Now select your profile and click the ‘Complete Connection’ button.

MonsterInsights will authenticate the connection and when it’s done, it will redirect you back to your MonsterInsights setup page.
That’s it. Your website is now connected to Google Analytics. But there are a few settings that we’ll need to walk you through.
Step 3: Choosing MonsterInsights Recommended Settings
MonsterInsights makes it incredibly easy to set up custom reports and settings for your site.
Right after connecting your site, the plugin will display recommended settings that you can choose to add to your site.

These reports are enabled by default:
- Events tracking
- Enhanced Link Attribution
- File Download Tracking
As you scroll down, you’ll see more settings for tracking info that you can configure:

- Affiliate Link Tracking – Two affiliate link paths are added by default, and you can add more affiliate link paths
- Access to MonsterInsights Reports – Choose who can see the MonsterInsights reports within the plugin
- Automatic Plugin Updates – Enable or disable the option to install updates automatically.
Now you can ‘Save and Continue’. On the next screen, you’ll see more tracking options, addons, and helpful plugins. These include:
- Standard Analytics & Reports – The standard MonsterInsights reports you’ll get in your WordPress dashboard
- Enhanced Link Attribution – This can help you see where users are clicking on your site
- 20+ Advanced Tracking – Even more advanced tracking, such as author tracking, form conversion tracking, scroll tracking, and more
- All in One SEO Toolkit – The best WordPress SEO plugin that integrates with MonsterInsights
- eCommerce Tracking – Instantly enable Enhanced eCommerce tracking
- Advanced Growth Tools – Get access to our campaign URL builder, popular posts addon, and A/B testing integration
- Privacy Compliance Addon – Helps Google Analytics become compliant with GDPR, CCPA, and more
- Advanced Reports – Get access to advanced reports inside MonsterInsights, such as a real-time report, search keywords, publishers and eCommerce reports, and more
- Smart Form Builder by WPForms – The most popular WordPress form builder plugin

Once you’ve added the recommended settings, you’ll see a success message ‘Awesome, You’re All Set!’

With that, you’ve successfully connected and configured a new Google Analytics property on your WordPress site.
Now you can ‘Finish Setup & Exit Wizard’ button.
Step 4: Set up Dual Tracking
Do you want to track your data on both platforms? MonsterInsights lets you do that with just a few clicks. You’ll be able to track both a Universal Analytics property and a GA4 property.
On the main Settings page of the MonsterInsights plugin, scroll down to Google Authentication and find the Dual Tracking Profile box.
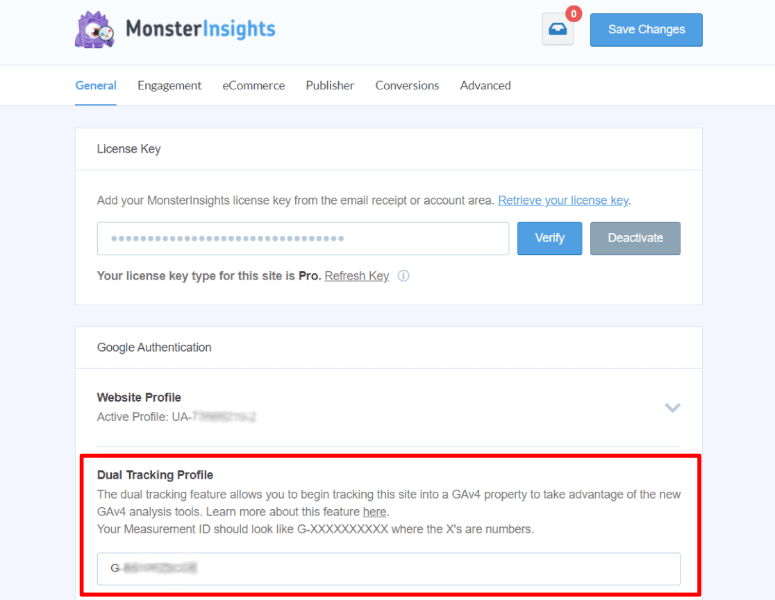
In the setup wizard, you would’ve set up either Universal Analytics or GA4. Accordingly, you can choose to set up the one you didn’t authenticate earlier using your Universal Analytics Tracking ID or your GA4 Measurement ID
Step 5: Create an API Secret
If you’ve set up Google Analytics 4 either as your main or dual tracking profile, then you’ll need to use an API secret. This will ensure that all of MonsterInsights’ tracking features work correctly.
To create an API secret, open Google Analytics and navigate to Admin.

Under the Property column, click Data Streams and open the data stream connected to MonsterInsights.
On this page, you’ll see an option called Measurement Protocol API secrets.

This lets you create a new API secret. You need to give it a nickname and click the Create button.
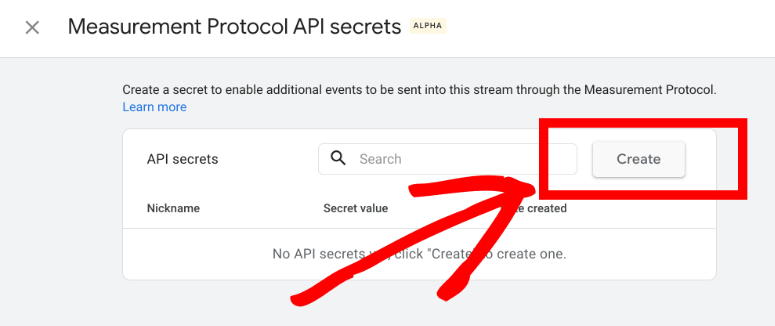
Now all that’s left to do is copy and paste the Secret Value in MonsterInsights.
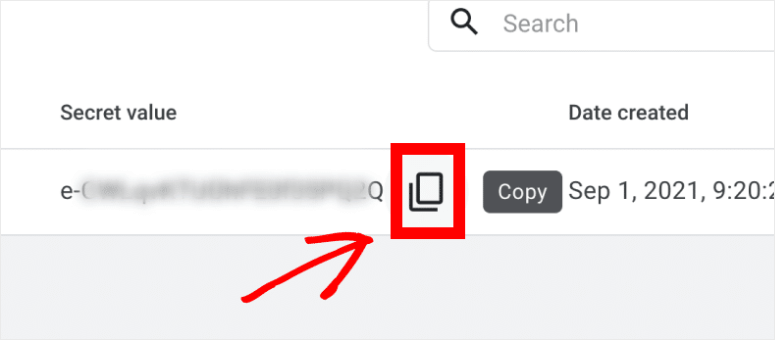
In your WordPress admin, go to Insights » Settings. In the Google Authentication section, there’s a field called Measurement Protocol API Secret. You need to paste the Secret Value here and the settings will automatically save.
That’s it! You’ve successfully added Google Analytics 4 to WordPress.
FAQs on Google Analytics 4
1. Do I have to use Google Analytics 4?
For now, you can continue to use Universal Analytics till July 2023. After that, you’ll have to switch to Google Analytics 4. We recommend setting it up now so that it starts collecting data in a new GA4 property. Once Universal Analytics is retired, your data will not be transferred to GA4.
2. Is MonsterInsights the only way to set up Google Analytics 4?
No, you can set up Google Analytics manually. This involves inserting a tracking code into your website’s coding in the header.php file. MonsterInsights is easier and requires no coding. All website owners can use this plugin including beginners.
If you already have Universal Tracking set up, you can access the GA4 Setup Assistant inside the admin menu. Follow the setup wizard to create your new GA4 property.
3. How to use Google Analytics 4?
Once you’ve set up Google Analytics 4 with MonsterInsights, you can see your reports inside your WordPress admin. In your WordPress menu, open the Insights tab and view your analytics reports.
4. Is there a Google Analytics 4 course?
Yes, Google has free online courses on everything related to Google Analytics including GA4. The course includes Google Analytics 4 tutorials to help you navigate the platform and learn how to use it.
5. Can I get a Google Analytics 4 certification?
Yes, there are plenty of online options to get certified in Google Analytics 4 including Google Analytics Academy, Skillshare, Udemy, and LinkedIn.
With that, you now know everything you need to know about Google Analytics 4 and how to set it up for your WordPress website.
Blog copy from – https://www.isitwp.com/how-to-set-up-google-analytics-4-wordpress/


