Do you want to increase the maximum file upload size in WordPress?
Sometimes a low file upload size limit can stop you from uploading files with the media uploader or installing larger WordPress plugins and themes.
In this article, we’ll show you how to easily increase the maximum file upload size in WordPress to fix those issues.
WordPress is a powerhouse with many themes and plugins that allow you to build almost any website, be it an ecommerce store or a corporate network. However, when choosing WordPress hosting, you should consider performance, security, and support in the first place.
If you are building a WordPress website that hosts a portfolio with large image files or a video hosting site with a single media file size running into GBs, then you might face a roadblock of not being able to upload media files larger than 25MB (in most cases).
In this article, you will learn the maximum upload size for WordPress and how you can check and increase it with the best methods.
What Is the Maximum Upload Size for WordPress?
By default, the maximum upload size in WordPress ranges from 2MB to 150MB, depending on your web hosting settings. Your hosting provider usually sets this limit at the server level to prevent timeouts.
How to Check the Current Maximum Upload Size in WordPress?
To check your WordPress site’s current max upload size limit, navigate to WP Admin → Media → Add New. You will see the current max upload size on the bottom, as shown in the screenshot.

If the current max upload size limit meets your demand, you can leave it as it is. However, if it doesn’t, don’t fret; there are many ways you can increase the max upload size in WordPress.
How to Increase Media File Maximum Upload Size in WordPress?
These are the best methods for increasing WordPress’s maximum upload size of media files.
- Update .htaccess File
- Edit functions.php File
- Edit php.ini File
- Increase Upload Size in Multisite
- Modify wp-config.php File
- Using Plugin Method
- Contact Hosting Provider
Method 1 – Update .htaccess File
If your web server is using Apache and PHP is set as an Apache module, then you can add a few lines of code in your WordPress .htaccess file to increase the max upload size in WordPress.
To access your .htaccess file, connect to your server via FTP client and navigate to the folder where WordPress is installed. Open up the .htaccess file in a code editor or Notepad and add the following lines.
php_value upload_max_filesize 64M
php_value post_max_size 128M
php_value memory_limit 256M
php_value max_execution_time 300
php_value max_input_time 300
Method 2. Create or Edit an Existing PHP.INI file
Another way to increase the maximum file upload size is by creating or editing a file called PHP.INI. This file controls a lot of settings for your WordPress hosting environment.
Most WordPress hosting providers like Bluehost, Siteground etc have a beginner friendly cPanel to help manage your website.
If your web host has a cPanel dashboard, then you can increase the file upload size through the built-in tools.
Note: The following is from the Bluehost ,Siteground etc cPanel, however, most shared hosting providers will have similar steps.
To do this, login to your WordPress hosting account dashboard and go to the ‘Software’ section.
Then, click on ‘MultiPHP INI Editor’.

Next, scroll down to the section labeled ‘upload_max_filesize’ and enter a new maximum filesize into the box.
Then, click the ‘Apply’ button.

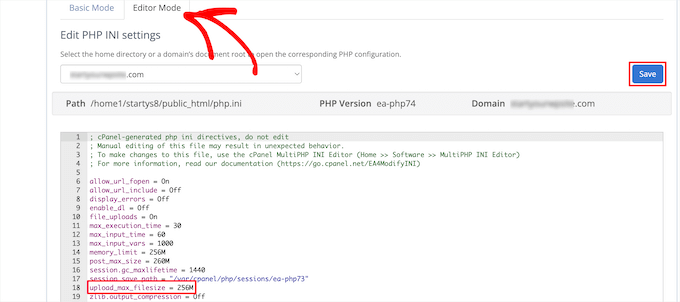
Alternatively, you can click the ‘Editor Mode’ menu tab and then you can change the maximum file upload size directly in the editor.
You need to edit the ‘upload_max_filesize’ section to increase your file upload size.
Once you’re finished click the ‘Save’ button.

Edit PHP.INI by Adding Code
If your current hosting provider doesn’t offer the cPanel option, then you’ll need to edit this file manually.
To do this, you can use an FTP client or the file manager option in your WordPress hosting control panel.
If you’re using shared hosting, then you might not see the PHP.INI file in your hosting directory. If you don’t see one, then simply create a file named php.ini and upload it to your root folder.
Then, add the following code snippet to the file.
upload_max_filesize = 256M
post_max_size = 256M
max_execution_time = 300
Method 3. Add Code to Your WordPress Theme functions.php File
This method involves adding code to your functions.php file in your WordPress theme.
If you haven’t done this before, then see our beginner’s guide to pasting snippets from the web into WordPress.
After that, you need to open your functions.php file via FTP or the file manager app in your hosting account dashboard.. To learn more, see our guide on how to use FTP to upload files to WordPress.
Then, add the following code snippet at the bottom of your functions.php file.
@ini_set( 'upload_max_size' , '256M' );
@ini_set( 'post_max_size', '256M');
@ini_set( 'max_execution_time', '300' );
4. Increase Upload Size in Multisite
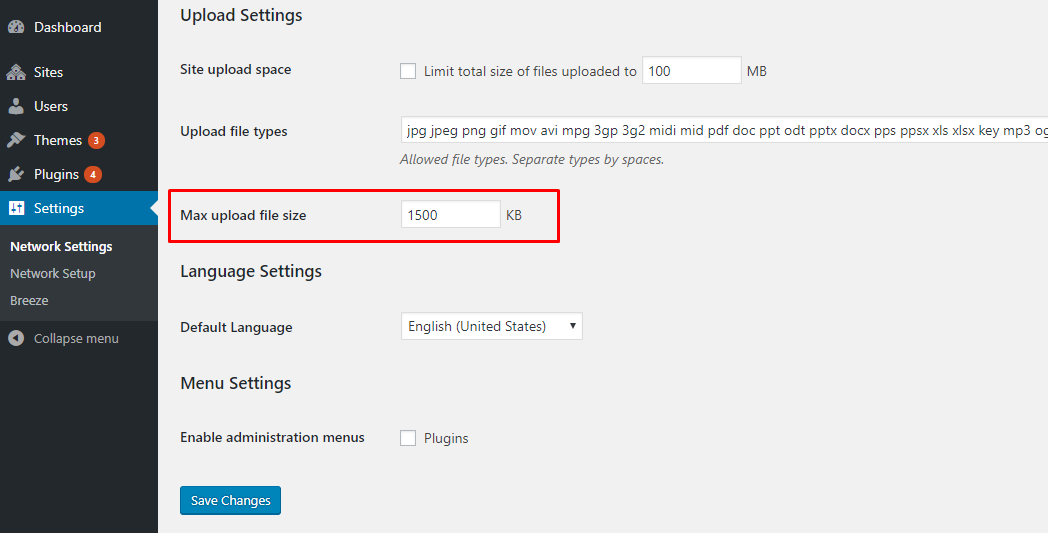
If you are running WordPress multisite, then upload size can be increased from settings. This increase is dependent on your server settings. If your server is set to 20MB, you cannot increase the WordPress upload size to 25MB. However, if your server is set to 20MB and your network setting is set to 15 MB, you can resolve the issue by increasing the upload size to 20MB.

Note: The maximum file upload size will be set by your hosting provider. If you need a file size limit that’s larger than the one listed in the drop down, then you need to contact your hosting provider and ask to increase the limit.
We hope this article helped you increase the maximum file upload size in WordPress.


